


Cookies 🍪
By clicking "Accept", you authorize Meilleur du Chef to store cookies on your device to personalize site content, analyze our traffic, and provide social media functionality.
Favourites


In one click, store and find all your favourite recipes.
Add this recipe >
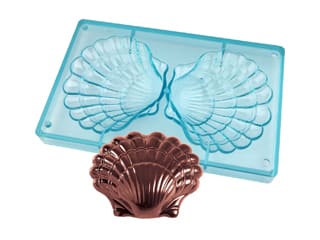
To make this chocolate shell, start by preparing all the ingredients.

Using tweezers, place pieces of gold leaf at the bottom of the scallop chocolate mould.

Make the gold leaf adhere to the mould by gently tapping it with a small soft-bristle brush.

This is what the result should look like. Set aside.

Chocolate tempering method: Heat a little water in a saucepan...

...and place a mixing bowl with a rounded bottom on top to create a bain-marie.

Pour the larger quantity of dark chocolate into the mixing bowl.

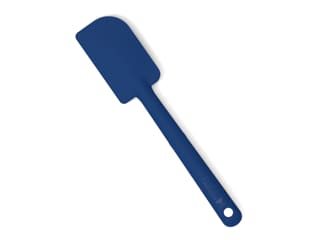
The water in the saucepan should be simmering. Stir the chocolate pellets with a spatula that is completely dry.

Continue mixing until the chocolate is fully melted.

While melting, check the temperature of the dark chocolate, making sure it doesn't exceed 45/50°C. Ideally, it should reach 50°C.

As you can see, I let the chocolate reach 52.6°C, which is not a big issue, but be careful not to go beyond that.

Remove the bowl from the bain-marie and mix thoroughly to ensure all the chocolate is melted.

The chocolate has cooled slightly and now reads 51.6°C.

Add the smaller quantity of dark chocolate. If you are using larger pellets, be sure to chop the chocolate beforehand to facilitate melting.

Mix the solid chocolate into the melted chocolate.

Gradually, the chocolate chunks will melt in the melted chocolate.

Check the temperature; it should drop by 15 to 20°C quite quickly. Here, our chocolate reads 31.3°C. Since the working temperature for dark chocolate is between 31 and 32°C, and the added chocolate is not yet fully melted...

...continue melting it with a heat gun, heating the chocolate from above at a distance of 30/40 cm. You can also heat it from underneath. If you don't have a heat gun, you can use a hairdryer.

The temperature will rise slightly, but be careful not to increase it by more than 5°C at once. You can raise it by 1 to 2°C while checking the temperature once the chocolate is well mixed.

Continue mixing until the chocolate reaches between 31 and 32°C, ensuring that there are no remaining solid pieces. The chocolate should be completely melted.

Our chocolate is now tempered and measures 31.5°C.

Pour the tempered dark chocolate into the cavities of the scallop shell mould...

...as shown in the photo.

The cavities should be filled to the brim.

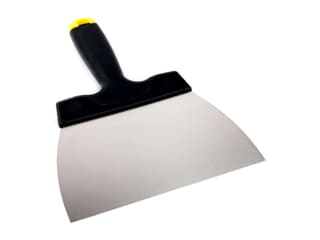
Tap the sides of the mould with a chocolate spatula to release any air bubbles and ensure the chocolate fully reaches the edges.

Flip the mould over the mixing bowl to drain the excess chocolate.

Tap the mould with the spatula to help remove any remaining excess chocolate.

Scrape the surface of a cavity with the chocolate spatula to obtain a clean finish.

Repeat the operation with the second cavity.

This is what the result should look like. Let it set at room temperature. Properly tempered chocolate will crystallize quickly (5 to 10 minutes) if the room temperature is cool (18 to 20°C).

Given the size of the mould, we will apply a second chocolate layer to ensure our shell is strong enough. The remaining chocolate must be kept at 31°C, so I continue reheating it with the heat gun (from above or below) occasionally to maintain a temperature between 31 and 32°C.

The chocolate should be stirred regularly...

...and temperature should be monitored closely. Here, it reads 32.1°C.

Continue mixing to cool it down a bit.

Now the chocolate reads 31.3°C.

Once the first chocolate layer has crystallized, refill the mould cavities with the tempered chocolate, ensuring it is between 31 and 32°C.

The cavities should be fully filled up to the top.

Tap the sides of the mould with the spatula to release any air bubbles.

Drain the excess melted chocolate back into the bowl.

Level the surface of the mould with the chocolate spatula...

...to get clean edges, as shown here. Let it crystallize at room temperature in a cool room. You can also place the mould in the fridge for 15 to 20 minutes for an easier release from the mould.

After crystallization, this is what the result should look like.

Flip the mould upside down over a baking sheet lined with parchment paper. Be careful, as the chocolate pieces may come loose and break. Hold the chocolate gently with your hand or fingertips.

You can apply a slight pressure on the mould to facilitate the release.

You can see the chocolate shells have a shiny finish with embedded gold leaf.

These two halves can be assembled to form a whole chocolate shell.

Assembly: Prepare the two chocolate scallops along with some sea shells chocolates (dark, milk, and/or white) if you want to fill your chocolate shell, as well as a baking sheet preheated in a 150°C oven for 10 minutes.

Form a ring with a clean, dry towel...

...and place one chocolate scallop inside to stabilize it.

Fill the inside with chocolate sea shells (optional).

Place the second scallop on top to check that it closes properly with the filling inside.

Gently place the top shell onto the warm baking sheet...

...then immediately lift it using a knife blade (before it melts too much). Here, I'm using chocolate gloves to avoid creating marks on the surface.

Align the top shell onto the bottom shell. Press gently and allow the chocolate to crystallize at room temperature.

Here is the result. You can speed up the crystallization process by placing the shell in the fridge for 10 to 15 minutes or using a cooling spray.

Your chocolate scallop is complete. It will keep well for several days (provided the tempering was done correctly). Enjoy!
Please login to post a review
