You can always send us your messages, comments or suggestions.
In one click, store and find all your favourite recipes.
Add this recipe >Before starting this Velvet Chocolate Yule Log recipe, organise all the necessary ingredients for the chocolate sponge.
For the chocolate sponge cake: Pour the eggs in the stand mixer recipient.
Add the castor sugar...
... and beat the preparation with a whisk over a simmering bain-marie...
... until the preparation reaches 60°C.
Place the recipient in the food mixer and beat until cooled down completely.
The preparation should double in volume and become pale.
Using a fine sieve, sift the flour and cocoa powder over a sheet of greaseproof paper.
Add the sifted mix to the blanched preparation...
... and combine carefully with a rubber spatula until completely incorporated.
Add the melted butter (it should have cooled down first) and combine.
Pour the preparation into a Flexipan Entremets baking mat 33.5 x 33.5cm...
... and spread with a metallic cranked spatula to an even thickness.
Cook in a fan-assisted oven at 170°C (gas 3) for about 15 minutes.
For the syrup:: In the meantime, gather all the ingredients for the syrup.
In a saucepan, place the castor sugar and water.
Zest half an orange with a peeler.
Zest half a lemon as well.
Split half a vanilla pod lengthwise and scrape the seeds out...
... and add the vanilla pod and seeds to the saucepan.
Bring to a boil.
Maintain the boil for about 10 minutes so the different flavours infuse in the syrup.
Remove the pan from the heat and leave to cool.
15 minutes later, the sponge cake should be cooked. Press gently on the surface of the biscuit to check whether it is cooked: it should be springy to the touch. If the finger marks stay printed in the biscuit, this means the sponge cake needs more baking. When cooked, remove from the oven and leave to cool at room temperature.
Flip the cold sponge cake on a sheet of greaseproof paper...
... then detach the four corners of the silicone mat and release carefully. The silicone mat should come off easily.
Using a graduated ruler, trim the ends and cut the sponge cake into strips to a width of 5 cm.
Rotate the baking parchment and trim the ends.
Cut the strips to a length of 23 cm.
For the chocolate mousse: Get the castor sugar and whole eggs ready. Cook the sugar in 5 or 10cl of water until the temperature reaches 121°C. Beat the whole eggs in a separate bowl, then pour the cooked sugar over the beaten eggs and whisk until cooled down completely. Monitor the sugar temperature closely. Once cooled down, the preparation is ready (called 'pâte à bombe').
Add the melted chocolate to the pâte à bombe...
... and combine vigorously with a whisk. The pâte à bombe and chocolate should have the same temperature to make sure the chocolate doesn't turn grainy.
This what the result should look like.
Add the whipped cream in two batches. Add half to the chocolate preparation...
... and combine with a whisk or rubber spatula.
Add the rest of the whipped cream...
... and fold gently with the rubber spatula...
... until smooth and homogeneous.
Place the Atomic silicone mould on a baking sheet.
Place the chocolate mousse in a piping bag and fill the bottom of the mould with 2 or 3 thick laces.
Using a small palette knife, create a volcano shape so that the mousse goes up on the sides. This operation is essential as it will get rid of air bubbles that might be visible on the surface of the log.
Place one strip of biscuit over the chocolate mousse and press gently with your fingers to bury it.
Add Grand-Marnier to the cold syrup and combine. The amount of liqueur varies according to the desired flavour intensity.
Steep the biscuit strip with a generous amount of syrup, using a pastry brush.
Pipe a lace of chocolate mousse over the biscuit...
... and cover with another biscuit strip. The strip should fit perfectly inside the mould.
Bury the biscuit in the chocolate mousse a little...
... and steep with a generous amount of syrup.
Pipe a lace of chocolate mousse over the biscuit...
... and spread evenly with the small cranked spatula.
Place a third strip of biscuit over the mousse and press gently.
Steep the biscuit with syrup.
Pipe a last lace of chocolate mousse over the biscuit...
... and spread to an even thickness.
Finish with a last strip of chocolate biscuit.
Steep with a generous amount of syrup.
Fill the gaps on the sides with chocolate mousse...
... and even the surface again with the cranked spatula.
Stretch cling film over the surface of the mould and store in the freezer overnight. The yule log should be completely frozen to ensure an easy release. If you're equipped with a freezer with boost function, I recommend using it.
When the log is frozen, take out of the freezer...
... and remove the cling film.
Place a yule log cake board (cut to the dimensions of the mould) over the mould. Detach the four corners of the mould carefully.
Flip the mould and release the log carefully. This should be easy if the cake is completely frozen.
There should no chunks of chocolate mousse attached to the silicone mould.
Immediately after, while the log is still frozen, spray the red pearl velvet coating over the surface of the log.
Make sure all sides of the log are coated with red velvet icing and the chocolate mousse is no longer visible.
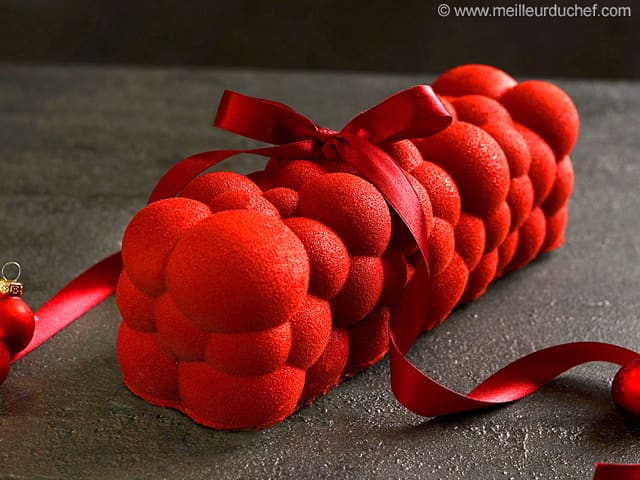
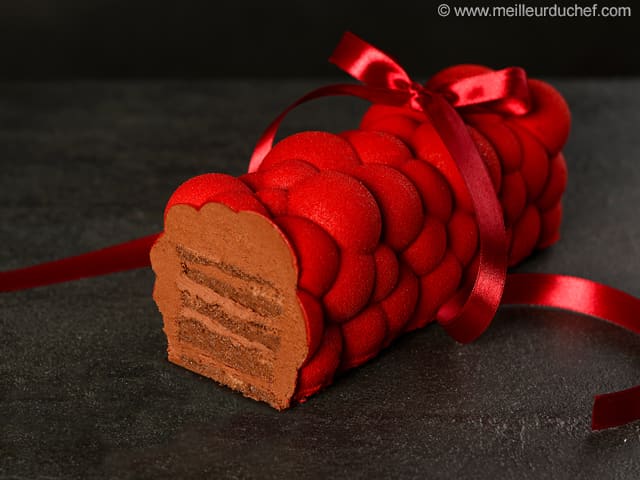
The velvet chocolate yule log is ready. Transfer onto a clean yule log cake board leave to defrost in the fridge for 3 or 4 hours. Enjoy this delicious Christmas dessert!
Please login to post a review